How to Pack a Kitchen for Moving An Atlanta Insider’s Guide
Packing your kitchen is easily the most dreaded part of moving. But let me tell you, a smart, strategic purge before you even think about taping up a box will completely change the game. This isn't just about tossing old spices; it’s about systematically reducing the volume of what you move, which saves you a surprising amount of time, money, and stress. A good, honest declutter can often cut your kitchen's contents by nearly half.
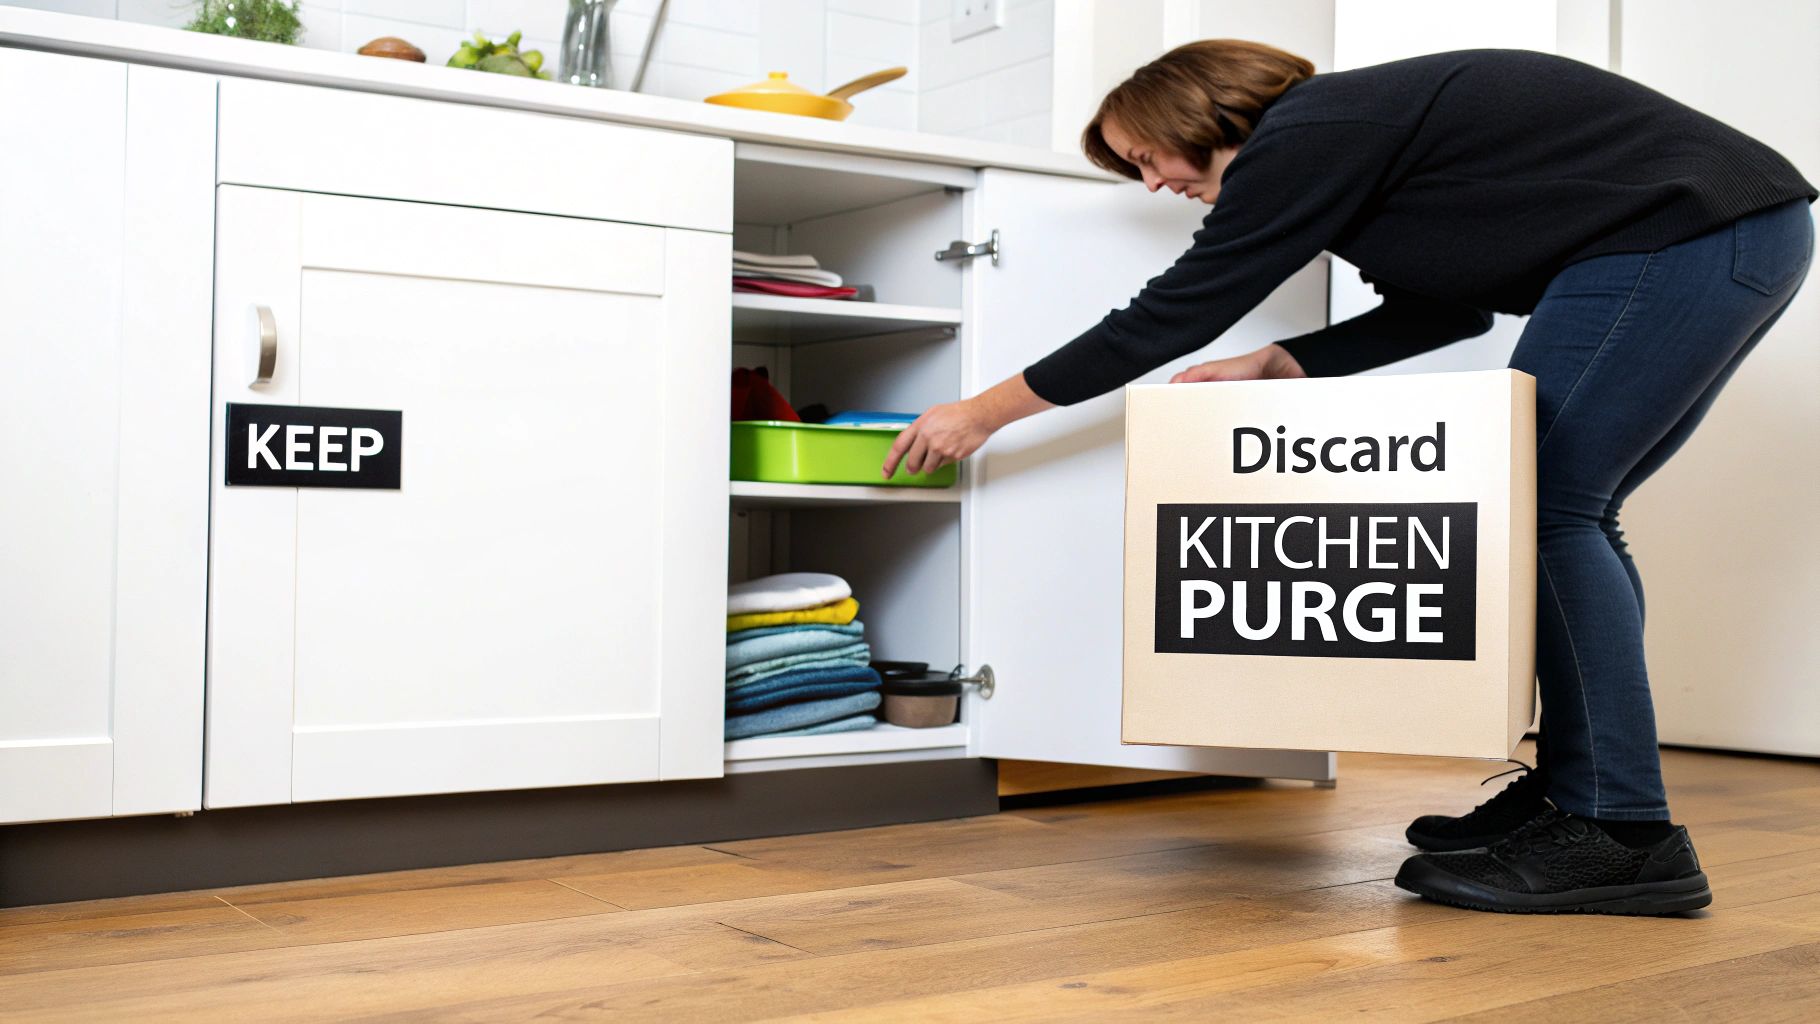
Start with a Strategic Kitchen Purge
The kitchen is the heart of the home, which means it’s also a magnet for clutter. Think about it: duplicate utensils, gadgets you used once, and that pantry full of "I'll use it someday" items. Most kitchens are packed with things that have no business coming to your new home.
Tackling this clutter first makes everything else—packing, labeling, unpacking—so much smoother. The less you have to move, the less you have to do. Period.
This initial cleanout isn't just about saving your back; it's about saving money and being a little kinder to the planet. Every year, moves in the U.S. generate a staggering 8.4 million tons of junk. A huge chunk of that comes from kitchens, including an estimated 345,000 tons of expired food. A smart purge can slash your personal contribution to this waste by 30-50%.
A Framework for Deciding What Goes
To keep from getting paralyzed by decisions, sort every single item into one of three piles: keep, donate, or discard. This forces a quick, decisive action for everything, from that weird avocado slicer to your collection of chipped coffee mugs. Before you start packing, it's also a great idea to understand how to organize kitchen cabinets—that mindset really simplifies the sorting process.
A visual guide can help keep you on track. This simple flowchart breaks it down into three clear steps.

This process shows you exactly how to sort through your stuff efficiently, making sure only the things you actually need get packed for the move.
Tackling Cabinets and Drawers
The key is to work one cabinet or drawer at a time. Don't try to do it all at once, or you'll get overwhelmed. Empty the entire contents onto a clear countertop so you can see exactly what you're dealing with. You’ll be shocked by the duplicates you find.
As you sort through everything, ask yourself these questions:
- When did I last use this? If it’s been collecting dust for over a year, it's a prime candidate for donation.
- Do I have more than one? You probably don’t need three can openers or four sets of measuring spoons. Keep the best, ditch the rest.
- Is it broken or worn out? Toss those chipped plates, cracked plastic containers, and scratched-up non-stick pans.
- Will I really use this in my new home? Be honest. If you haven't baked a cake in five years, that collection of pans can probably find a new home.
Pro Tip: Set up three bins or boxes and label them "Keep," "Donate," and "Discard." As you decide on an item, immediately put it in its box. This physical separation stops you from second-guessing and keeps your workspace from becoming a chaotic mess.
Handling Small Appliances and Pantry Items
Small appliances are serious space hogs. That bread maker you used twice? The juicer that’s now a permanent fixture on the counter? They are perfect candidates for rehoming. Before you keep any appliance, plug it in and test it to make sure it still works.
For the pantry, be absolutely ruthless with expiration dates. Check every can, box, and jar. Any non-perishable, unexpired food you don’t want can be donated to a local food bank.
For the things you decide to toss—especially bulky appliances or a large volume of junk—getting professional help ensures it's all disposed of responsibly. While most junk removal companies take everything to the landfill, Fulton Junk Removal recycles through its partner, Beyond Surplus, to minimize waste and maximize reuse. This circular, eco-friendly solution is ideal for environmentally conscious homeowners.
Gathering the Right Packing Supplies
Using the wrong supplies to pack your kitchen is a rookie mistake that almost always ends in disaster. This is one room where flimsy, second-hand grocery boxes and cheap tape just won’t cut it. Investing in the right materials from the start is the best insurance against broken dishes and frustrating, last-minute runs to the hardware store.
Your Foundation: The Right Boxes and Cushioning
The cornerstone of a well-packed kitchen is a set of sturdy, high-quality boxes. While standard moving boxes are fine for some things, the kitchen requires a few specialists in your lineup.
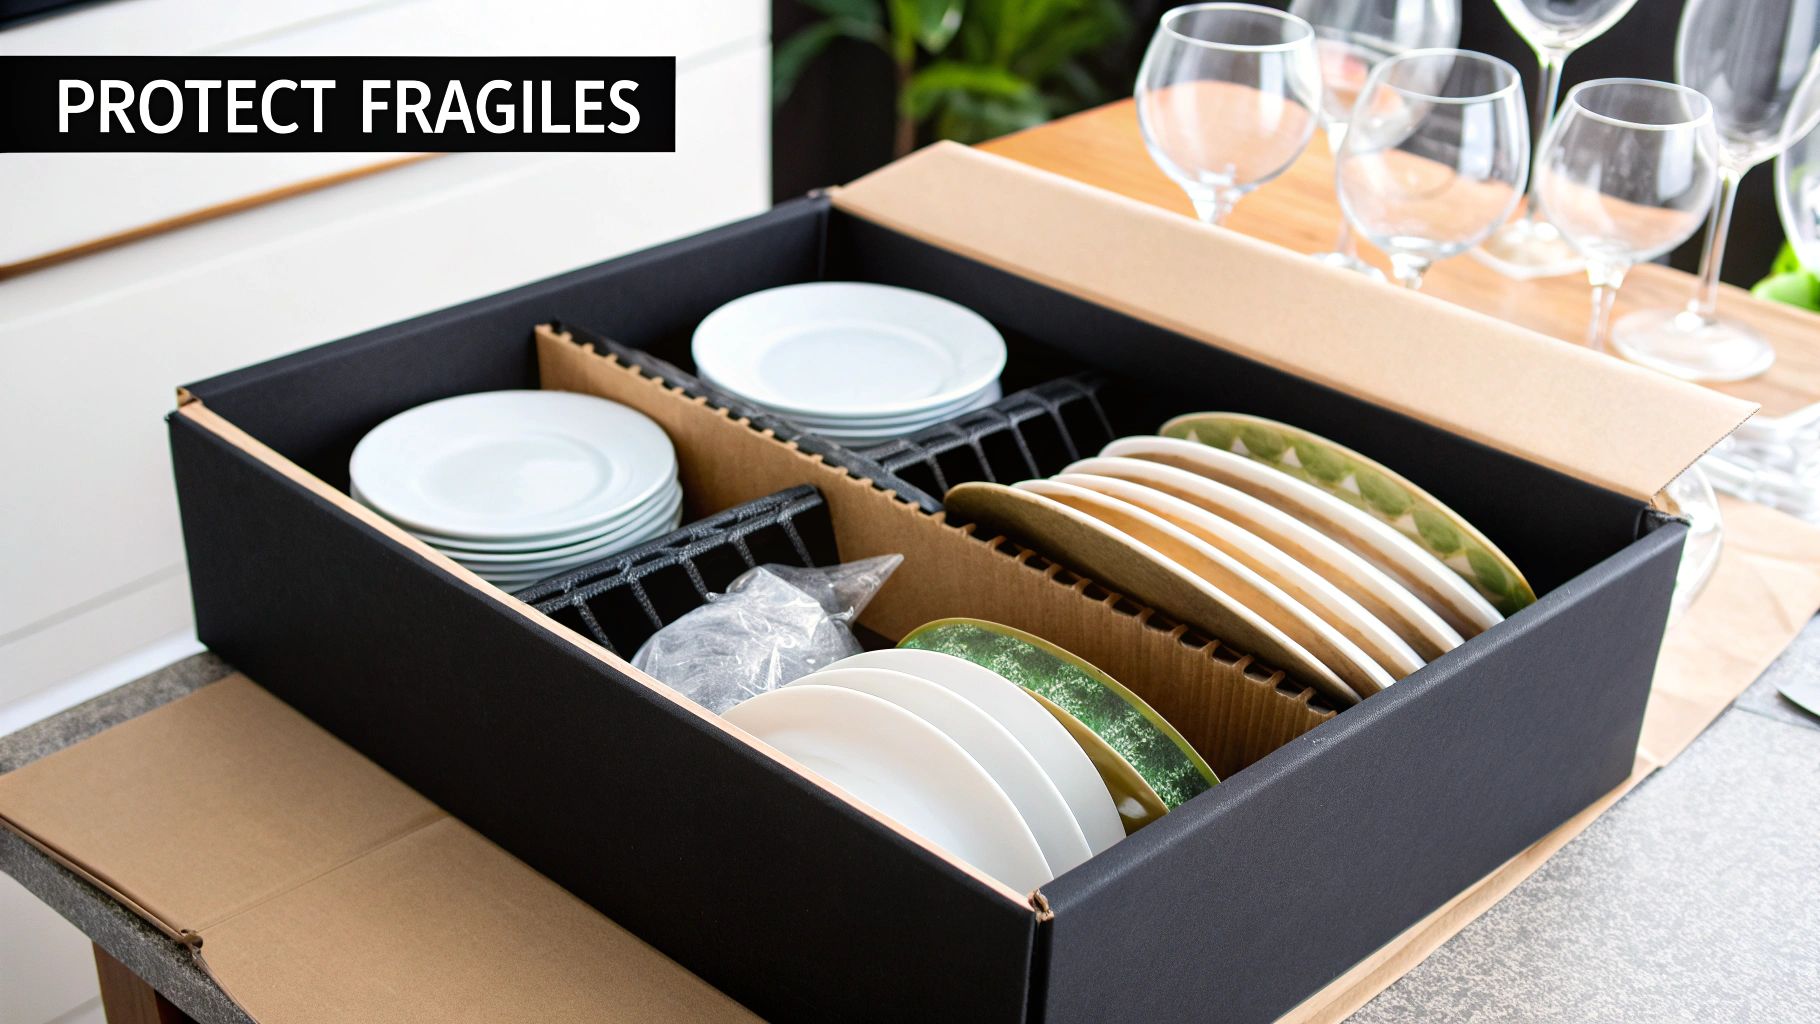
First up, dish pack boxes, also known as dish barrels. These are non-negotiable. They’re made from double-walled corrugated cardboard specifically designed to protect fragile items like plates, bowls, and glassware from the inevitable bumps of a move. Many come with optional cell dividers, which create individual compartments for stemware and glasses, stopping them from clinking together in transit.
Once you’ve got your boxes sorted, it’s all about the cushioning. A common mistake is using newspaper, but the ink can easily transfer onto your fine china, leaving permanent smudges. It’s worth getting the right stuff.
A quick-reference list can make shopping for these supplies much easier.
Essential Kitchen Packing Supplies Checklist
Here’s a look at the specific supplies you’ll need to pack your kitchen safely and efficiently, along with our recommended quantities for an average-sized kitchen.
| Supply Item | Recommended Quantity (for average kitchen) | Best Use Case |
|---|---|---|
| Dish Pack Boxes | 2-4 boxes | Plates, bowls, glassware, and other fragile items. |
| Medium Boxes | 5-7 boxes | Small appliances, pots, pans, and pantry items. |
| Heavy-Duty Boxes | 2-3 boxes | Cookbooks, canned goods, and other heavy, non-fragile items. |
| Unprinted Packing Paper | 1 large roll (10 lbs) | Wrapping individual dishes, glasses, and filling empty space in boxes. |
| Bubble Wrap | 1 medium roll | Extra protection for extremely delicate items like crystal or fine china. |
| Cell Dividers | 2-3 sets | Separating stemware, glasses, and mugs inside dish pack boxes. |
| Heavy-Duty Packing Tape | 3-4 rolls | Securing the bottoms and tops of all boxes, especially heavy ones. |
| Stretch Plastic Wrap | 1 roll | Bundling utensil trays, securing lids on pots, and keeping cords with appliances. |
| Permanent Markers | 2-3 markers | Clearly labeling every box with its contents and destination room. |
| Box Cutter/Scissors | 1 pair | Cutting tape, paper, and breaking down boxes. |
This checklist covers the essentials, ensuring you have what you need on hand before you start wrapping your first glass.
Smart Sourcing and a Pro Mover’s Secret
Gathering supplies doesn't always mean buying everything brand new. You can often find free or low-cost boxes from local community groups or liquor stores—their boxes are perfectly compartmentalized for glassware. Just make sure you inspect any used boxes for cleanliness and structural integrity before you trust them with your breakables.
A professional mover's trick is to always have a roll of stretch plastic wrap on hand. It's perfect for bundling silverware trays, securing lids to pots, or wrapping small appliances to keep cords and attachments together. It’s a small investment that prevents a lot of chaos.
As you gather supplies, you'll also get a clearer picture of what you don't want to move. Responsible disposal is a key part of the process. For more ideas on decluttering before a move, check out other articles on our blog. Planning for junk removal ahead of time ensures you get a clean break from your old space without leaving a mess behind.
Protecting Your Fragile Dishes and Glassware
This is it. This is the part of packing the kitchen that gives everyone anxiety. A box full of shattered family heirlooms or your favorite coffee mugs is a completely avoidable moving-day tragedy, but it happens all the time. Let’s walk through the exact techniques we use to make sure your fragile items arrive in one piece.
The entire process boils down to one core principle: cushion, wrap, and stack. It all starts by creating a soft, springy base in your dish pack box. Just crumple up several sheets of packing paper and lay them in the bottom. This first layer acts as a critical shock absorber for every bump in the road.
The Right Way to Pack Plates and Bowls
Here’s the biggest mistake I see people make: packing plates flat, like a stack of pancakes. This puts an incredible amount of pressure on the bottom plates, making them almost guaranteed to crack. The right way is to always pack them vertically, like records in a crate.
Here’s how to do it safely:
- Wrap Individually: Lay a single plate in the center of a stack of packing paper. Pull one corner over the plate, then another, tucking the paper tightly as you go. One at a time.
- Bundle Up: Once you’ve wrapped three or four plates, stack them together and re-wrap the entire bundle with a few more sheets of paper for extra security.
- Stack on Edge: Carefully place the wrapped bundle into the box on its edge. Keep going until the box is full, making sure every bundle is packed snugly against the last one.
For bowls, the method is nearly identical. Wrap them individually, just like plates. You can then nest two or three wrapped bowls together, re-wrap the whole nest, and place it into the box on its side. This distributes any pressure evenly and stops things from shifting around.
Mastering Glassware and Stemware
Glassware, especially delicate wine glasses or champagne flutes, needs a bit more finesse. The goal here is to support the item from both the inside and the outside, leaving zero empty space where pressure can build up and cause a crack.
First, gently stuff a half-sheet of crumpled packing paper inside each glass. It’s a simple step, but it provides crucial internal support and prevents the glass from collapsing under pressure. Next, wrap the outside of the glass with a full sheet of paper, rolling it diagonally while tucking in the ends as you go.
For stemware, that fragile stem is your weak point. After wrapping the main body of the glass, use an extra piece of paper to wrap just the stem and base. This creates a cushioned buffer right where it’s needed most.
Pro Tip: When packing glassware, always use cell dividers inside your dish pack boxes. These simple cardboard inserts create individual compartments for each glass, stopping them from clanking against each other. It’s a small investment that provides maximum protection.
Handling Awkwardly Shaped Items
So, what about the items that don’t fit neatly into a box? I’m talking about large serving platters, giant mixing bowls, or delicate china teacups. The principles are the same, but you’ll need to adapt your technique.
- Large Platters: Wrap these just like plates, but don’t be shy with the packing paper. Always stack them vertically on their edge.
- Mixing Bowls: Wrap big bowls on their own and stuff them with crumpled paper. If you have a matching set, you can nest them with a layer of paper between each one before placing them in the box.
- Delicate China: For extremely fragile items like fine china, extra cushioning isn't optional. When you need to safeguard your most treasured dishes, glassware, and other fragile kitchen items, plenty of bubblewrap is your best friend. Wrap each piece in packing paper first, then add a protective layer of bubble wrap before you place it carefully in a well-padded box.
Once a box is full, your final job is to fill any remaining gaps. Use crumpled packing paper to stuff all the empty spaces at the top and along the sides. A perfectly packed box should have absolutely no internal movement. If you give it a gentle shake, you shouldn't hear or feel a single thing shifting inside. This last bit of attention to detail is what separates a successful pack from a box of broken glass.
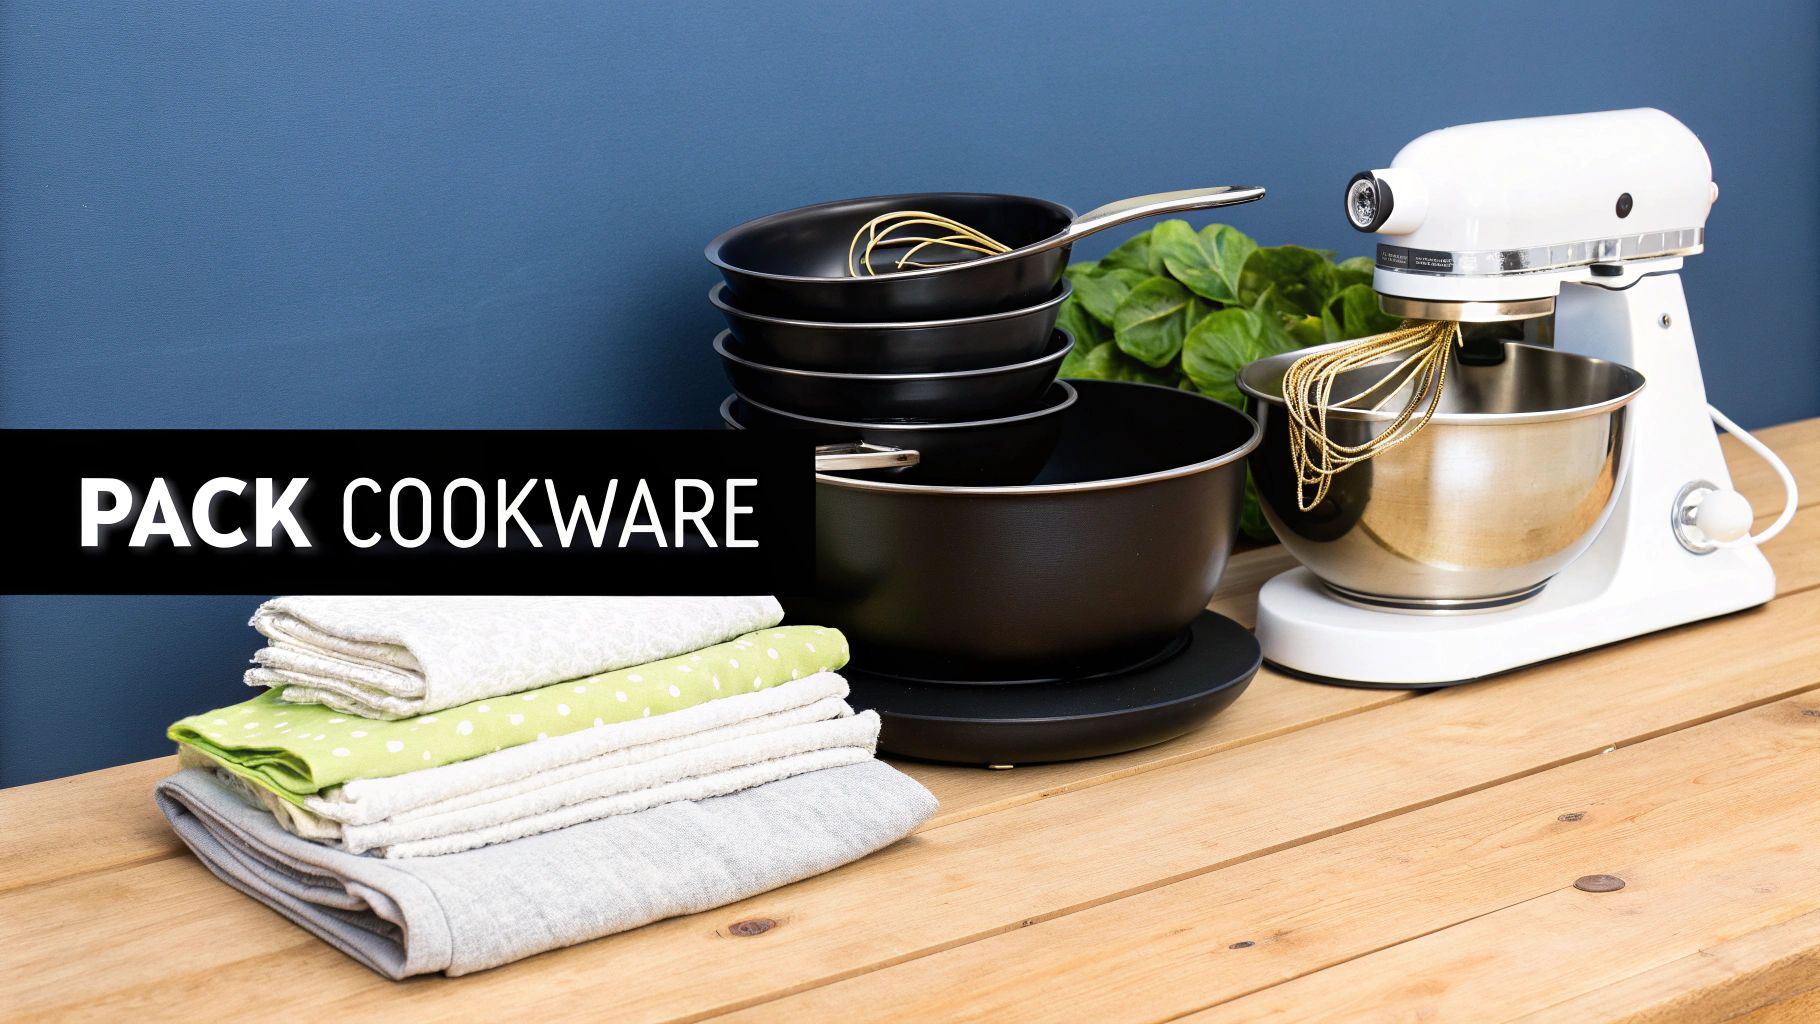
Packing Pots, Pans, and Small Appliances
After carefully wrapping all your fragile dishes, you might think the rest of the kitchen is a cakewalk. But your heavy cookware and pricey small appliances can be a real headache. These items are bulky, awkward, and prone to scratches or dents if you just toss them in a box. The real art of packing a kitchen is finding that perfect balance between protecting your gear and not wasting a single inch of box space.
Think of packing your pots and pans like those Russian nesting dolls. Grab a sturdy, medium-sized moving box and place your biggest pot at the bottom. Before you put the next pot inside, add a layer of protection—a folded dish towel or a few sheets of packing paper will do the trick.
This simple buffer stops the metal from scraping together during the move. Just keep nesting them, pot inside of pot, with a soft layer in between each one. It’s an incredibly efficient way to use space and keeps your entire cookware set together.
What to Do with Lids and Loose Items
So, your pots are neatly nested, but what about all those lids? Sticking them on top of their matching pots creates a wobbly, unstable mess that wastes space and risks damage. Don't do it.
Instead, wrap each lid individually in packing paper. You can then slide them vertically into the box right alongside the pots. It’s a much more secure fit. If you have glass lids, give them an extra layer of bubble wrap for good measure.
Protecting Your Small Kitchen Appliances
That stand mixer, coffee maker, and air fryer were an investment. The first step, before any packing, is to give them a good cleaning. You don’t want old food crumbs attracting pests or creating strange smells in your new home.
If you kept the original boxes and packaging, you’re golden—that’s always the best way to move them. That custom-fit styrofoam was designed to keep the appliance perfectly snug. If the original box is long gone, a heavy-duty moving box is your next best bet.
Here’s how to pack them safely in a standard box:
- Build a Cushion: Start by lining the bottom of the box with a thick layer of crumpled packing paper or bubble wrap.
- Secure Detachable Parts: Take off any removable pieces, like the blender pitcher, mixer bowl, or coffee pot. Wrap these items on their own and pack them in the same box.
- Tame the Cords: Coil the power cord neatly, secure it with a rubber band, and tape it to the appliance so it doesn’t swing around and scratch the finish.
- Fill Every Gap: Place the appliance inside and stuff all the empty space around it with more packing paper. You want it to be completely immobile.
It’s easy to underestimate the value of your kitchen gadgets. While 22.7% of Americans hire full-service movers who are pros at this, the 61.6% of DIY movers often discover damaged electronics upon arrival. With the U.S. moving industry valued at $110.97 billion, learning how to protect your stuff is more than just smart—it's economical.
Dealing with Knives and Utensils
A jumble of sharp knives and loose silverware is a recipe for disaster. For your knives, safety comes first. Use blade guards if you have them. If not, you can easily make your own by folding a piece of cardboard over the blade and taping it shut. Once all the blades are covered, wrap each knife in paper and bundle them together with rubber bands.
As for silverware, here’s a pro tip: leave it right in the drawer tray. Just lift the whole thing out, wrap it tightly with several layers of plastic stretch wrap, and lay it flat inside a box. Your forks and spoons stay organized and are ready to use the moment you unpack.
If you’ve decided some of your old or broken appliances aren’t worth moving, don’t just leave them on the curb. Many contain electronic components that need to be recycled properly. Fulton Junk Removal can offer a bundled junk removal and recycling pickup, where all electronic waste and recyclable materials are directly processed by Beyond Surplus, ensuring they stay out of the landfill.
Managing Your Pantry and Perishables
Let's be honest: paying movers to transport half-empty ketchup bottles and soon-to-expire canned goods is just silly. Think of it as paying to move things you're about to throw away anyway. A little planning in the weeks before you move can save you money, lighten your load, and prevent a whole lot of food waste.
Your mission, should you choose to accept it, starts about three to four weeks before moving day. This is the perfect time to take a full inventory of your pantry, fridge, and freezer. But don't just make a list—create a strategic "eat-down" plan. Group items into potential meals and get creative in the kitchen. That lonely can of beans and that forgotten bag of frozen corn? They're destined for taco night.
What to Pack (and How to Do It Right)
As you work your way through your food supply, you can start boxing up the non-perishables you’re definitely taking with you. We're talking about canned goods, unopened jars, and anything in sturdy, sealed packaging.
- Canned Goods: These are surprisingly heavy. Always pack them in small, strong boxes. A large box packed to the brim with cans can easily top 50 pounds, making it a nightmare to lift and a prime candidate for a blowout.
- Spices and Seasonings: Your biggest enemy here is a pantry-wide explosion of paprika or oregano. To prevent this, unscrew each spice jar, place a tiny piece of plastic wrap over the opening, and then screw the lid back on tightly. For extra security, group them all in a large, sealed plastic bag.
- Glass Jars: Things like olive oil, vinegar, and pickles need individual attention. Wrap each jar in packing paper or bubble wrap, stand them upright in the box, and make sure they're packed snugly to prevent them from clanking around.
Key Takeaway: The ultimate goal is to move as little food as possible. For any unopened, non-perishable items you won't get to, donate them to a local food bank. It’s an easy way to lighten your load while helping out your community.
Items You Should Never, Ever Move
Some items are more than just a hassle to move; they’re either prohibited by moving companies or a guaranteed recipe for a sticky, smelly disaster. Make a firm "do not pack" list and stick to it.
This list should include, without exception:
- Perishable Foods: Anything from your fridge or freezer simply won't survive the trip, especially if you're moving long-distance. Enjoy it, give it away, or toss it.
- Open Liquids: That half-used bottle of balsamic vinaigrette or cooking wine is practically begging to spill all over your belongings. It's just not worth the risk.
- Hazardous Materials: Most professional movers won't transport cleaning supplies, especially things like aerosols, bleach, and ammonia. Check with your moving company for their specific list of forbidden items.
During your pantry purge, you might uncover old cleaning chemicals, expired food, or even a broken small appliance. For anything you can't donate or use, responsible disposal is key. If you're in the metro area and find yourself with a pile of unwanted items, you can learn more about junk removal in Atlanta to get it handled safely and sustainably. It’s the perfect way to ensure your move is clean from start to finish.
The Final Step: Labeling and Clearing Out
You’ve done it. You’ve purged, packed, and protected every last plate and pot. But the job isn't quite finished when you tape up the last box. This final phase is all about making your move-in day a breeze and leaving your old kitchen genuinely clean. Smart labeling and responsible junk removal are the two things that make for a truly seamless transition.
Think of labeling as a treasure map you're leaving for your future, exhausted self. A box just marked "Kitchen" is a recipe for chaos when all you want is the coffee maker on moving morning. Vague labels mean you'll be tearing open a dozen boxes just to find one thing, turning your new kitchen into a frustrating fortress of cardboard.
Beyond Basic Box Labeling
To sidestep that unpacking dread, you need a system that gives you info at a glance. The goal is to know exactly what’s inside a box and how badly you need it without ever reaching for a box cutter.
Here’s a simple but incredibly effective method I’ve seen work wonders:
- Be Specific: Instead of just "Kitchen," get detailed. Write "Everyday Mugs & Coffee Maker" or "Pots & Pans (Stove Cabinet)."
- Give it a Priority: Mark each box with a number or color. Think "1 – Unpack First" for essentials and "3 – Unpack Last" for stuff like the fancy cake stand or fine china.
- Assign a Location: Note exactly where in the new kitchen it should go, like "Pantry – Canned Goods" or "Under Sink – Cleaning Supplies."
This level of detail is a complete game-changer on move-in day. You can immediately stack the low-priority boxes in the garage and get right to setting up the essentials. Your new kitchen will be functional in hours, not days.
A little secret from the pros: label at least three sides of every box—the top and two opposite sides. That way, no matter how they’re stacked on the truck or in your new home, you can always see what’s inside without having to shift a single thing.
Tackling the Leftover Pile
After all the packing, you’re always left with a mountain of stuff—the things that didn't make the cut. This pile might have a broken microwave, old non-stick pans you can't donate, worn-out furniture, and bags of random clutter. A quick trip to Goodwill often isn't enough to handle it all.
This is where so many moves get bogged down. The sheer amount of waste a move creates is staggering. Moves in the U.S. produce 900 million boxes and 90 million pounds of packing paper every single year. With the Southeast, including Atlanta, leading the country in how often people move, this waste problem is a big deal here.
Plus, industry trends show that partial moving services are projected to grow at a 5.32% CAGR by 2031. This points to a clear pattern: people are happy to pack themselves but desperately need professional help to clear out that final 20-30% of decluttered junk and post-move debris.
This is where a specialized service becomes essential—not just for your sanity, but for doing the right thing for the environment.
Choosing an Eco-Friendly Cleanout Solution
Most people don’t realize that the majority of junk removal companies take everything they collect straight to a landfill. Your old electronics, metal appliances, and other recyclable materials end up buried forever, adding to a massive environmental problem. But there's a much better way to get that truly clean slate.
Fulton Junk Removal operates under Beyond Surplus, a circular, eco-friendly solution that goes beyond traditional junk hauling. We work hand-in-hand with Beyond Surplus to recycle electronics, metals, and other materials responsibly, diverting items from landfills and ensuring they're repurposed.
Here’s what that actually means for your move-out cleanout:
- Electronics Recycling: That old toaster, microwave, or blender you’re leaving behind won’t see a landfill. Beyond Surplus makes sure all electronic waste is processed responsibly.
- Metal Repurposing: We ensure the materials from old pots, pans, and appliances are properly recycled and given a new life.
- Sustainable Disposal: For everything else, we prioritize donation and repurposing first, drastically minimizing the environmental footprint of your move.
This approach is obviously a huge win for environmentally conscious homeowners, but it’s also a game-changer for offices, warehouses, and property managers. Fulton handles junk removal, and Beyond Surplus ensures responsible recycling, making compliance and sustainability reporting easier. When you choose this kind of bundled service, you’re not just clearing out your space; you’re making a responsible choice that benefits the whole community. You can discover more about our commitment to sustainable practices and our unique partnership with Beyond Surplus.
Got Questions About Packing a Kitchen? We've Got Answers.
Even with the best plan, you're bound to run into a few head-scratchers when you're surrounded by boxes and bubble wrap. Here are some of the questions we hear all the time.
What Should I Pack First in My Kitchen?
Always start with the things you use the least. Think about specialty items like fine china, holiday-themed cookie cutters, that huge roasting pan you only pull out for Thanksgiving, or the cookbooks you don't reference every week.
Getting these non-essentials boxed up first is a huge win. It clears out a surprising amount of space and lets you keep your daily-use plates, coffee maker, and utensils accessible right up until moving day.
Can I Use Towels to Wrap Dishes?
Absolutely. Using dish towels, old t-shirts, and other linens to wrap sturdy items like plates, mixing bowls, and pots is a fantastic way to save space and be a little more eco-friendly. It's a classic packing trick for a reason.
However, a word of caution: for your really delicate stuff—like thin wine glasses or antique china—stick with proper packing paper. It molds tighter and offers more reliable protection against bumps and vibrations.
Once the decluttering and packing are done, you're usually left with a pile of unwanted items—everything from that old microwave to random odds and ends. Instead of dealing with multiple donation runs or leaving a mess for the new owners, a professional cleanout is the simplest way to get a truly fresh start.
For homeowners and property managers who care about where their junk ends up, Fulton Junk Removal provides a complete solution. We've partnered with Beyond Surplus to make sure electronics and metals are properly recycled right here in Georgia, not just dumped in a landfill. Your move-out can be both clean and conscious.
Ready for that clean slate? Let Fulton Junk Removal take care of what's left behind. Schedule your eco-friendly cleanout today.