How to Remove Mold from Drywall a Homeowner’s Guide
If you've found a small patch of surface mold on your drywall, you can often handle it yourself with the right safety gear and a cleaning solution. The process is pretty straightforward: isolate the area, use a mold-killing agent like vinegar or hydrogen peroxide, and then dry the spot completely.
But here’s the critical part: for larger infestations or mold that’s gone deep into the drywall, cleaning just won’t cut it. You must replace the affected drywall to get rid of the problem for good.
Assessing Mold on Your Drywall: When to DIY vs. Call a Pro
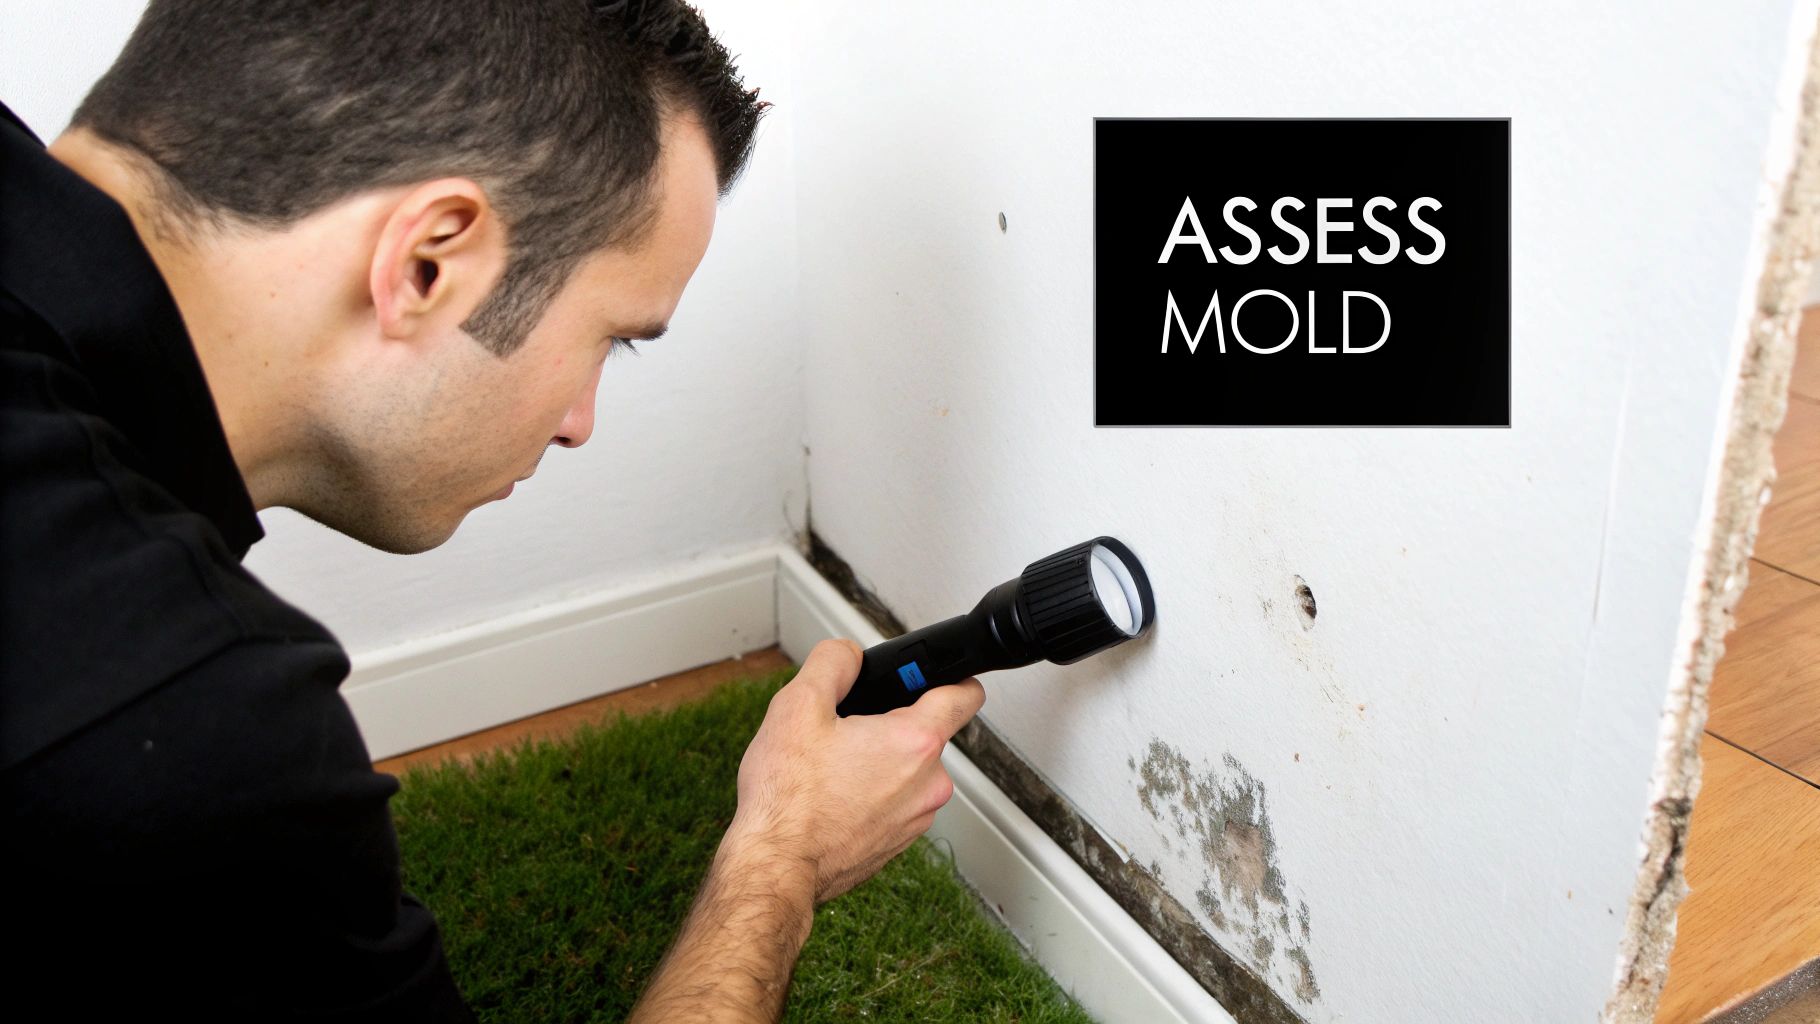
Finding mold on your drywall is never fun, but don't panic. The first step is to take a calm, methodical look at the situation. You need to figure out if you're dealing with a minor surface issue or something much bigger that has weakened the drywall itself.
In the professional world, we often use a simple guideline called the "10-square-foot rule." It’s a reliable standard for deciding between a DIY job and a situation that needs an expert. If the total moldy area is less than 10 square feet (think of a 3×3 foot patch), you can probably tackle it. Anything bigger than that is a red flag—it poses a much higher risk of sending a massive cloud of spores into your air, and that requires professional containment.
Identifying the Extent of the Damage
Size isn't the only factor; you also need to check how deep the contamination goes. Surface mold might look like fuzzy or slimy spots on the paint, and that's often treatable. But some signs tell you the problem is more than skin deep.
- Persistent Musty Odors: A strong, earthy smell that won't go away is a classic sign that mold has gotten behind the drywall and is growing in the wall cavity.
- Drywall Integrity: Gently press on the moldy spot. If it feels soft, spongy, or crumbles under your fingers, the mold has already eaten through the paper and gypsum core. That section has to be cut out and replaced.
- Widespread Discoloration: Dark stains that look like they've soaked deep into the drywall paper mean the mold's "roots" are embedded in the material. A surface wipe-down won't solve this.
This hands-on inspection is crucial. If you ignore deep-seated mold and just clean the surface, you're only putting a band-aid on the problem. It will always come back.
The decision to call a pro usually comes down to the size and severity of the mold growth. This quick decision tree makes it simple.
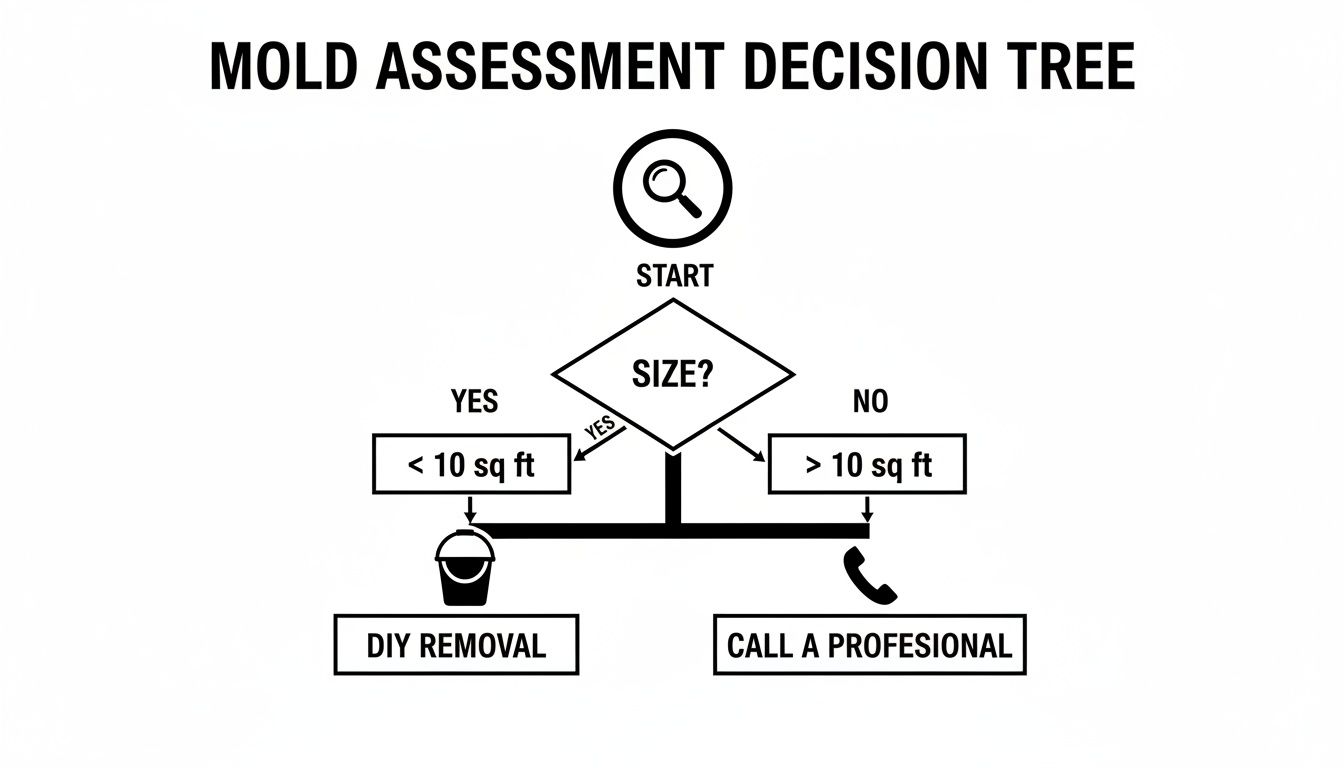
As the flowchart shows, once mold covers more than 10 square feet, calling in a professional is the safest and most effective move.
Key Takeaway: The 10-square-foot rule is more than a guideline; it's a safety threshold. Going past this limit without professional equipment and containment dramatically increases the risk of cross-contamination and health problems.
DIY Cleanup vs Professional Remediation Decision Guide
Still on the fence? Use this quick reference table to decide whether you can handle the mold yourself or if it's time to hire a professional service.
| Situation | Recommended Action | Reasoning |
|---|---|---|
| Mold patch is smaller than 10 sq. ft. | DIY Cleanup | The area is small enough to be managed safely with proper PPE and ventilation without significant spore release. |
| Mold patch is larger than 10 sq. ft. | Call a Professional | Large infestations require professional containment to prevent spores from spreading throughout the property. |
| Drywall is soft, crumbling, or warped. | Call a Professional | The structural integrity is compromised. A pro can safely cut out and replace the damaged section. |
| You smell a strong, musty odor. | Call a Professional | This indicates hidden mold behind the walls or under flooring, which requires specialized equipment to locate and remove. |
| The mold is in your HVAC system. | Call a Professional | HVAC systems can spread mold spores everywhere. This requires a certified HVAC mold remediation specialist. |
| Someone in the household is sensitive to mold. | Call a Professional | For individuals with allergies, asthma, or compromised immune systems, it’s best to avoid any exposure and let experts handle it. |
| Mold reappears after you've cleaned it. | Call a Professional | This means the underlying moisture source hasn't been fixed or the initial cleanup wasn't thorough enough. |
Ultimately, when you're in doubt, calling a professional is the safest bet for your health and your home.
Drywall is a magnet for mold, which is why the global mold remediation market was estimated at USD 1.23 billion in 2023. Drywall issues alone made up around 35-36% of that demand, showing just how often this material needs professional help after water damage.
When it comes to large-scale cleanouts—like after a major renovation where you've torn out contaminated drywall—you can't just toss it in a regular dumpster. Our team at Fulton Junk Removal handles the responsible disposal of this kind of waste. To be absolutely sure about the air quality in your home, especially if you suspect hidden mold, it's worth considering professional mold VOC testing.
You can learn more about our commitment to eco-friendly junk removal and our mission to keep materials out of landfills by reading about the story behind Fulton Junk Removal.
Gathering Your Essential Tools and Safety Gear
Before you even think about touching that moldy drywall, let’s talk safety. This isn't a suggestion—it's the most critical part of the job. The moment you disturb mold, it releases millions of microscopic spores into the air. These can trigger respiratory issues and, even worse, spread the contamination to other parts of your home.
Think of it like a pre-flight checklist. You wouldn't skip it, and you can't skip this. Getting the right tools and personal protective equipment (PPE) ready is non-negotiable.
Personal Protective Equipment (PPE) is Non-Negotiable
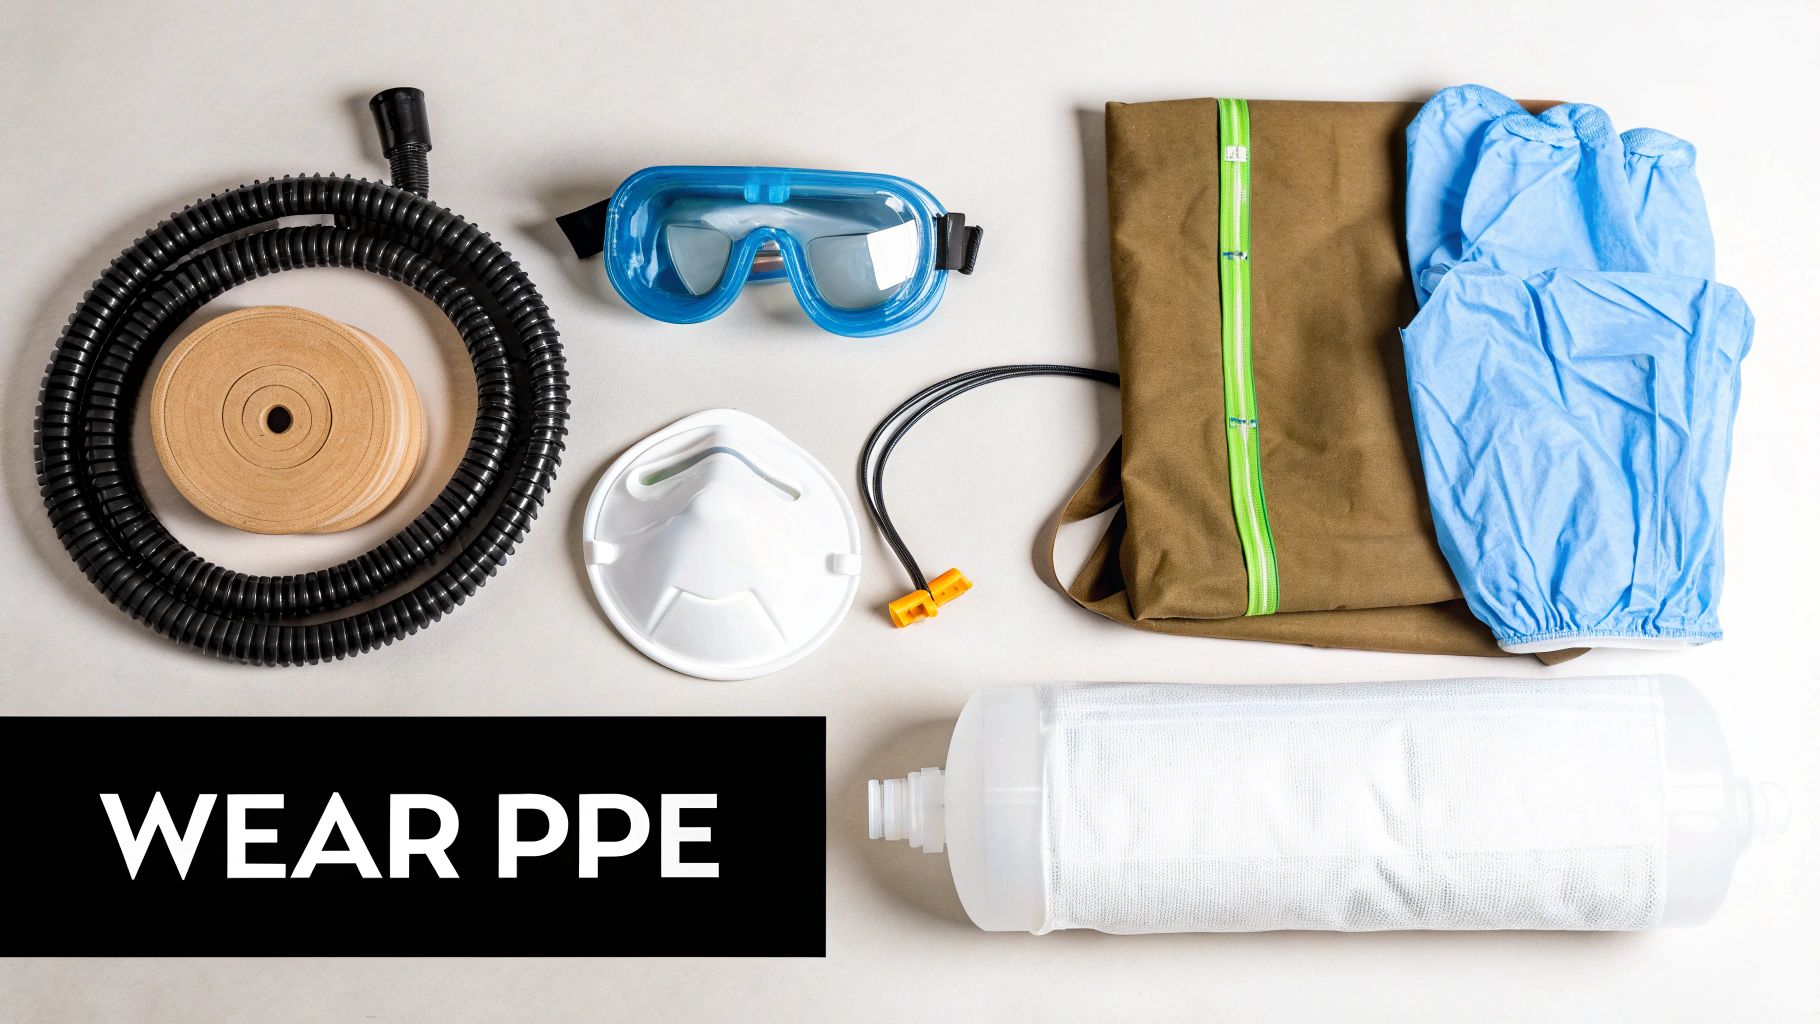
When you're dealing with mold, your health comes first. Those spores are known irritants and allergens, so protecting your lungs, eyes, and skin is absolutely essential. Don't even start without this basic kit:
- N95 Respirator: A simple dust mask won't cut it. You need an N95 at a minimum, which is designed to filter out at least 95% of those tiny airborne particles. It's your first line of defense.
- Safety Goggles: Spores can easily irritate your eyes. Grab a pair of goggles that create a good seal—your everyday glasses leave gaps and won't offer real protection.
- Disposable Coveralls with Hood: Mold spores will settle on anything, including your clothes and hair. A set of coveralls prevents you from accidentally tracking the contamination through your house when you're done.
- Long Rubber Gloves: Make sure they go up to your forearms. This protects your skin from direct contact with mold and any of the cleaning solutions you'll be using.
The EPA has clear guidelines on this, and they don't mess around when it comes to emphasizing protective gear.
This isn't just our advice; it's a fundamental step that environmental health experts insist on, even for what seems like a small patch of mold.
Tools for Containment and Cleanup
Once you’re fully geared up, your next mission is to keep the mold contained. You need to create a sealed-off work zone to stop spores from escaping.
Pro Tip: Set up negative air pressure in the room. Just place a box fan in a window, facing out, and use plastic to seal off the rest of the window opening. This creates a vacuum effect, pulling airborne spores outside instead of letting them drift into the rest of your house.
Here’s the checklist for the actual job:
- Thick Plastic Sheeting (6-mil): This is for sealing doorways and covering floors. If you can't move furniture out of the room, cover it completely with this.
- Painter’s Tape: You'll need plenty of this to secure the plastic sheeting and create airtight seals around vents, outlets, and the doorway.
- HEPA-Filtered Vacuum: Your regular household vacuum will just suck up spores and shoot them right back out. A vacuum with a HEPA (High-Efficiency Particulate Air) filter is designed specifically to capture microscopic particles like mold.
- Heavy-Duty Trash Bags: Don't use flimsy kitchen bags. All contaminated materials—from the drywall scraps to your disposable PPE—need to be double-bagged for safe disposal.
- Spray Bottles: You’ll want a couple of these on hand for applying water (to damp down dust) and your cleaning solution.
- Stiff Brushes and Sponges: Essential for scrubbing away any surface mold that can be cleaned.
Get everything on this list ready before you start. The last thing you want is to leave the contaminated area halfway through the job to grab a tool, as that’s a surefire way to spread spores. For more practical home maintenance tips, feel free to check out the other guides on the Fulton Junk Removal blog.
Effectively Cleaning Surface Mold from Drywall
Okay, you've confirmed the mold is just on the surface, you’ve got your safety gear on, and you're ready to get to work. Dealing with a manageable patch of mold on drywall is more than just a quick scrub—it's about using the right approach and the right solutions to kill the fungus for good without accidentally making things worse. The entire goal here is a safe, methodical cleanup that keeps the problem from coming back.
Before you even think about cleaning, you need to isolate the area. It's a non-negotiable step. Why? Because even a small disturbance can launch thousands of invisible spores into the air, and they'll happily find a new place to call home. Use your plastic sheeting and painter's tape to completely seal off the doorway of the room. Don't forget to cover any HVAC vents, too. This is exactly what pros do on every single job, no matter how small.
Choosing Your Cleaning Solution
Not all cleaners are up to the task, especially when you're working with a porous surface like drywall. Your first instinct might be to grab the bleach, but for this specific job, that’s usually a bad move.
Here are a few far more effective and accessible options:
- White Vinegar: This is my go-to recommendation. Undiluted white vinegar is acidic enough to seep into the porous drywall and kill the mold's roots. It’s cheap, safe, and gets the job done.
- Hydrogen Peroxide (3% solution): Just like vinegar, hydrogen peroxide is a powerful antifungal and antiviral agent that will kill mold. It’s a solid alternative, but keep in mind it can have a mild bleaching effect on some paint colors.
- Commercial Mold Cleaners: Plenty of products out there are made specifically for mold. If you go this route, make sure you get one that is EPA-registered and explicitly designed for porous surfaces.
Myth Buster: Bleach on Drywall
Using bleach on drywall is one of the most common mistakes people make. Bleach is mostly water. Its active ingredient, chlorine, stays on the surface while the water soaks right into the drywall, feeding the very mold roots you're trying to eliminate. This is why mold often comes back with a vengeance after a bleach "cleaning."
The Correct Cleaning Technique
The real secret to getting rid of mold on drywall isn't elbow grease—it's patience. You need to let your cleaning solution do the heavy lifting.
- Saturate the Area: Fill a spray bottle with your vinegar or hydrogen peroxide. Spray the moldy spot until it is completely soaked. Don't hold back.
- Let It Sit: This is the most crucial step. You have to let the solution sit on the surface for at least one hour. This "dwell time" gives the cleaner a chance to work its way into the drywall paper and kill the fungus at its source.
- Scrub and Wipe: After an hour has passed, grab a stiff-bristled brush and gently scrub the surface to lift the dead mold. Then, wipe the area clean with a damp cloth, rinsing it often in a separate bucket of clean water.
- Repeat if Necessary: For really stubborn spots, you might need to do a second round. Just re-apply the solution, let it dwell again, and wipe it clean.
Following this method ensures you’re not just wiping away a stain; you're actually killing the organism causing it.
Final Steps: Drying and Prevention
Getting the mold off is only half the battle. If you leave the drywall damp, you’re just rolling out the welcome mat for mold to return. Thoroughly drying the area is absolutely critical.
Point a few fans directly at the cleaned spot to get the air circulating and speed up the drying process. In rooms that tend to be humid, like a bathroom or basement, running a dehumidifier for 24-48 hours is a great way to finish the job. You want that drywall to be completely bone-dry to the touch.
The porous nature of drywall is precisely why it's such a common place for mold to grow once moisture gets involved. In fact, industry data shows that drywall surfaces are involved in 35–38% of all mold remediation jobs. In response, builders are increasingly using mold-resistant drywall, signaling a shift toward more proactive materials. You can learn more by exploring insights on the growing drywall market.
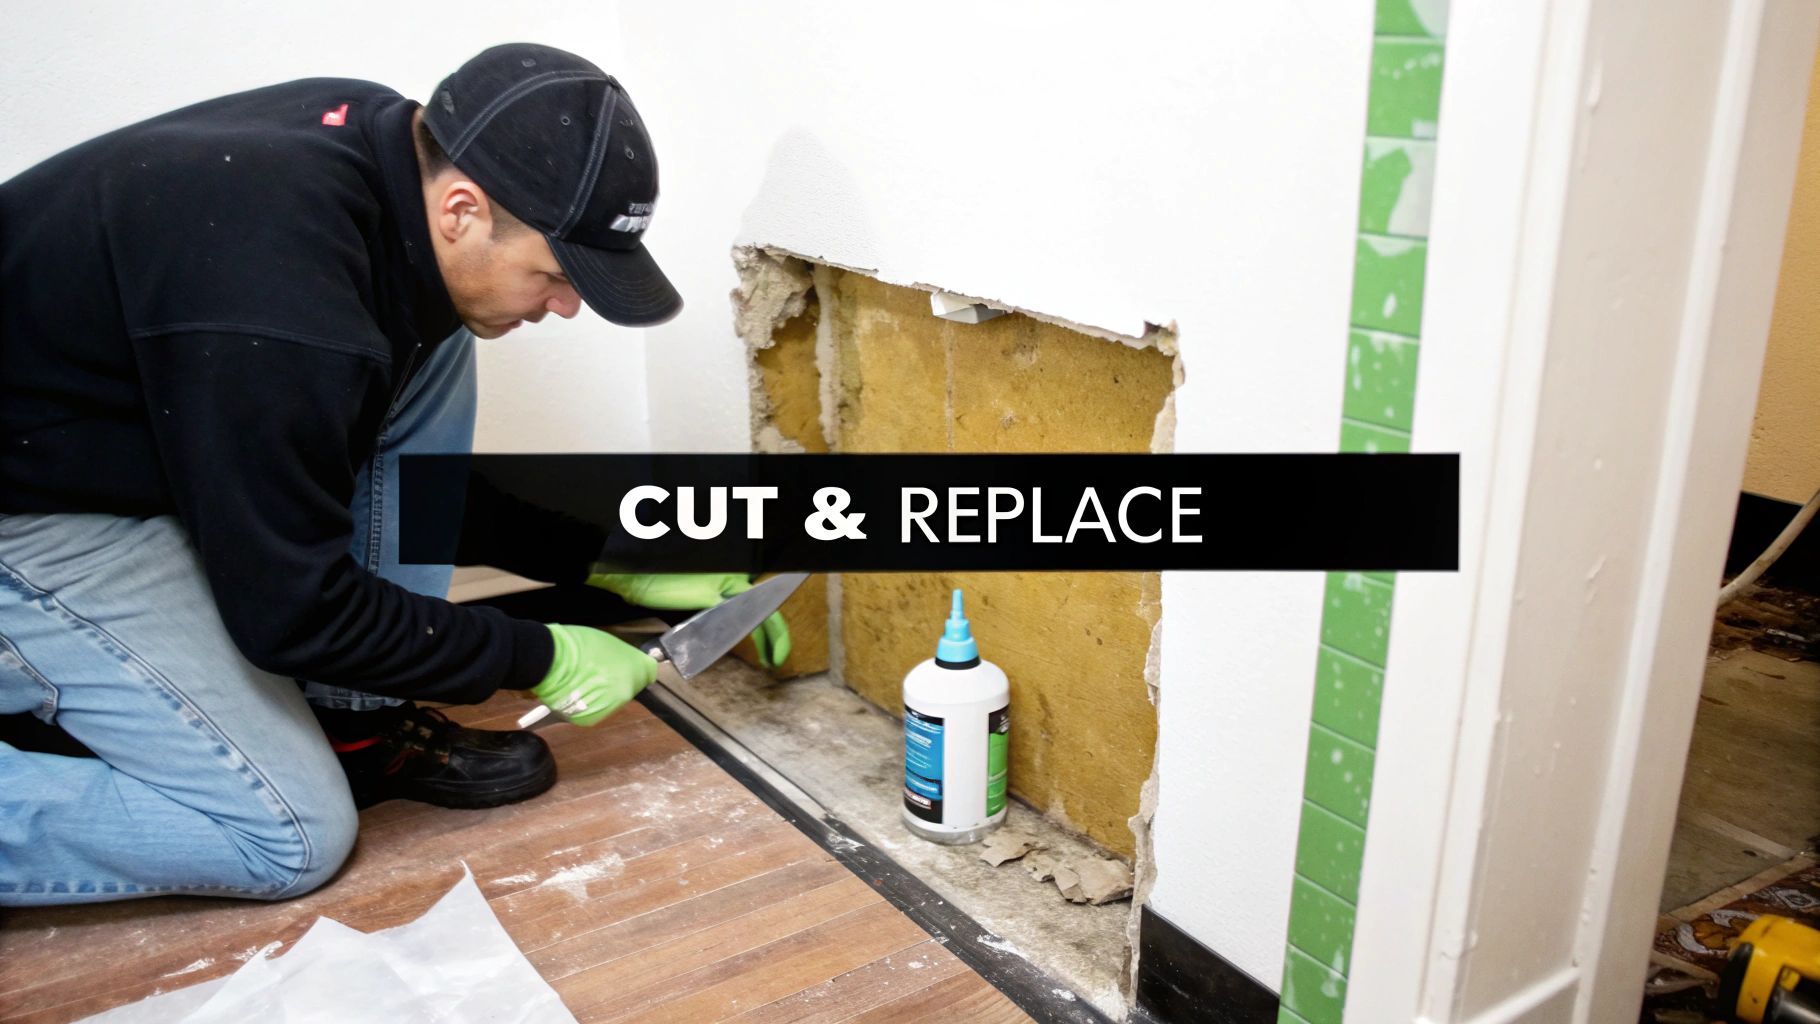
How to Cut Out and Replace Moldy Drywall—The Right Way
When you see mold that’s more than just a surface stain, cleaning it just won’t cut it. At this point, the mold has sent its roots—called mycelia—deep into the drywall’s paper and gypsum core. The structural integrity is shot, and the only real solution is to cut out the contaminated section entirely. This isn’t just about tearing down a wall; it’s a controlled demolition designed to stop spores from spreading and to prep the area for a lasting repair.
First things first, you need to mark the area for removal. And whatever you do, don't just trace the edge of the visible mold. That's a rookie mistake. The invisible network of spores and mycelia almost always extends far beyond that discolored patch.
Professional Standard: We always mark our cutting line at least 12 inches beyond the visible edge of the mold on all sides. This buffer zone is non-negotiable if you want to be certain you've removed every last trace of the contamination.
Grab a straightedge and a pencil to draw a clean, rectangular box around the whole problem area, including your buffer zone. This gives you a clear guide for a precise cut and makes patching the wall a whole lot easier later.
Preparing for a Controlled Demolition
Before a single tool touches that wall, you have to lock down the environment. The moment you cut into moldy drywall, you’re going to unleash a cloud of spores. The goal is to keep that release to an absolute minimum and contain what does get out.
A simple trick of the trade is to lightly mist the marked section with a spray bottle of water. This little step helps weigh down the spores, keeping them from going airborne as you work. Don't drench the wall—a fine mist is all it takes to make a huge difference in air quality.
Once you’ve misted the area, you're ready to start cutting.
- Score with a Utility Knife: Start by scoring the pencil line with a fresh, sharp utility knife. Run it over the line a few times to get a clean cut through the paper and into the gypsum.
- Cut with a Drywall Saw: With the line scored, use a drywall saw to cut along your guide. Go slow and steady to stay on the line. Always be aware of what could be behind the wall—electrical wires and plumbing pipes are common surprises.
- Gently Remove the Section: Carefully pry the cut section out. If you feel resistance, it’s likely screwed to a stud. Find the screws, back them out, and then pull the piece away.
Following this method is crucial for getting the moldy section out safely and cleanly.
Inspecting What’s Behind the Wall
With the bad drywall gone, you have a clear view into the wall cavity. This is a critical moment. You need to carefully inspect everything you see for more mold—check the wooden studs, the insulation, and the back of the drywall on the other side.
- Check the Studs: If you spot mold on the wood studs, you’ll need to scrub them down with a mold-killing solution (undiluted white vinegar works great) and a stiff brush. Let them dry completely before you do anything else.
- Inspect the Insulation: Any insulation with signs of mold or water damage is a lost cause. It must be removed and replaced, as it’s impossible to clean effectively. Cut it out carefully and bag it up right away.
- Find the Moisture Source: This is the most important step. All that mold grew for a reason. Look for a slow pipe leak, signs of condensation, or water getting in from outside. If you don't fix the underlying moisture problem, the mold is guaranteed to come back.
Once the cavity is clean, completely dry, and the leak is fixed, you can start the repair process with a new piece of drywall. Now, what about the mess? All that contaminated debris—from the drywall to the insulation—needs to be handled carefully. Double-bag everything in heavy-duty trash bags and seal them tight. For larger jobs, especially in commercial spaces like offices or warehouses, managing this kind of hazardous waste is best left to the pros. To see how we handle large-scale debris, take a look at the commercial junk removal services we provide to ensure everything is disposed of responsibly.
Responsible Disposal of Contaminated Materials
Once you've cut out the contaminated drywall, the job isn't quite done. Getting rid of that moldy debris is just as critical as the removal itself. You can't just toss it in your regular trash bin—it needs to be handled with care to prevent spores from spreading all over again.
The professional standard is simple but non-negotiable: double-bagging. Every piece of contaminated material, from the drywall and insulation down to your used gloves and mask, must go into heavy-duty contractor trash bags. We're talking the thick stuff, at least 6-mil. Seal the first bag tightly with duct tape, then place it inside a second bag and seal that one up, too. This creates a solid, airtight barrier.
When Your Curbside Bin Isn't Enough
If you've only removed a small patch, your local waste management might take the double-bagged materials, but you absolutely have to check their rules first. Don't just assume it's okay.
But for larger jobs—think a basement flood cleanup, a full office renovation, or a major property cleanout—your standard trash service won't cut it. The sheer volume of debris is one problem, and the hazardous nature of the waste requires special handling that they aren't equipped for.
This is especially true for commercial properties. Property managers for offices and warehouses need a reliable solution to ensure compliance and keep the environment safe. A stack of sealed bags sitting by the dumpster for days isn't just an eyesore; it's a liability waiting to happen.
Key Takeaway: Proper disposal is about finality. You want that mold gone from your property for good, with zero risk of it re-contaminating your space or someone else's during transit.
The Advantage of Professional Junk Removal
This is where calling in a professional service makes all the difference. Instead of wrestling with a pile of hazardous bags, making multiple trips to the landfill, or navigating municipal regulations, a junk removal company handles the entire process. It’s the clean, final step to your remediation project.
- For Homeowners: It's total peace of mind. The hazardous material is gone, and you don't have to think about it again.
- For Property Managers: It's a streamlined solution that guarantees regulatory compliance and a fast turnaround, making sustainability reporting easier.
- For Businesses: It means less operational downtime. The debris from your renovation is cleared out quickly and safely so you can get back to work.
The U.S. mold remediation market was valued at around USD 335 million for 2024, and it's growing. Here in Georgia, factors like storm season and aging buildings mean there's a real need for rapid-response services. Local companies that can provide certified disposal documentation are a huge asset, particularly for property managers focused on sustainability. You can read more about these market trends here.
An Integrated and Eco-Friendly Solution
At Fulton Junk Removal, we offer a solution that’s more than just disposal. Operating under our parent company, Beyond Surplus, we provide a circular, eco-friendly approach that goes beyond traditional junk hauling. While most companies take everything to the landfill, we work hand-in-hand with Beyond Surplus to ensure materials are recycled or repurposed responsibly.
For large projects, we can offer a bundled junk removal and recycling pickup. While the sealed bags of contaminated drywall are taken to an approved landfill for safety, all other non-hazardous materials like electronics, metals, and construction debris are directly processed by Beyond Surplus for recycling. This integrated service minimizes waste, maximizes reuse, and appeals to environmentally conscious businesses.
When you’re ready to clear out the aftermath of your mold remediation project, you can count on Fulton Junk Removal for a complete and responsible cleanup.
Common Questions About Drywall Mold Removal
Even with a solid game plan, you're bound to have questions pop up during a mold removal project. It happens to everyone. Below, I’ve tackled some of the most common questions we hear from homeowners and property managers, with straightforward advice to help you move forward with confidence.
Can I Just Paint Over Mold on Drywall?
This is easily the most frequent question, and the answer is a hard no. Painting over mold is like slapping a bandage on a major wound—it might hide the ugly truth for a little while, but it does absolutely nothing to fix the underlying problem. Standard paint won't kill the mold; it just covers it up.
Here's what really happens: the mold continues to feast on the drywall paper safely hidden beneath the new paint. It’s only a matter of time before it grows right through that fresh coat, causing it to bubble, blister, and peel. Even worse, the trapped mold keeps releasing spores into your wall cavity and, eventually, back into your home's air.
The only real solution is to get rid of the mold completely and, just as importantly, fix the moisture source that let it grow in the first place. A good mold-killing primer is a great tool, but it should only be used after the drywall has been fully cleaned, sanitized, and is bone dry.
What Is the Main Cause of Mold on Drywall?
At the end of the day, the number one cause of mold on drywall is excess moisture. Drywall is basically a gypsum core sandwiched between two thick sheets of paper. That paper is organic, making it a perfect meal for mold.
But mold can't grow without water. The most common culprits we see are:
- Slow Leaks: That tiny, persistent drip from a pipe hidden inside a wall is a classic recipe for a mold disaster.
- Exterior Water Intrusion: Water seeping in from a leaky roof, poorly sealed windows, or cracks in the foundation will saturate drywall from the inside out.
- High Humidity: Any space with consistently high humidity (think above 60%), like basements or bathrooms without proper ventilation, creates an ideal breeding ground.
- Major Water Events: Things like floods or a burst pipe are obvious culprits. If the area isn't dried out immediately, mold is practically guaranteed.
Finding and fixing the source of the water is the most critical step of any remediation job. If you don't stop the leak, the mold will just keep coming back.
How Can I Tell Mold from Mildew on Drywall?
People tend to use "mold" and "mildew" interchangeably, but they're not the same thing. Knowing the difference helps you understand what you're really up against.
Mildew is a surface-level fungus. It usually looks like a gray or white powdery patch on the drywall. The good news is that you can typically wipe it away with a standard household cleaner because it doesn't burrow deep into the material.
Mold, on the other hand, is much more destructive. It often appears fuzzy or even slimy and can show up in different colors like black, green, or yellow. The key difference is that mold penetrates deep into porous materials like drywall, causing real structural damage. If you're seeing dark stains that have discolored the drywall paper, or the spot feels soft and spongy to the touch, you're definitely dealing with mold.
Key Insight: Mildew lives on the surface, but mold grows into its food source. This is why moldy drywall often needs to be cut out and replaced, while mildew can usually just be cleaned off.
When Should I Call a Remediation Company vs a Junk Removal Service?
This is a crucial distinction, especially for property managers or homeowners tackling a big cleanout. You call different pros at different stages of the job.
It's time to call a professional mold remediation company when:
- The mold covers an area larger than 10 square feet.
- You find mold growing in your HVAC system.
- The water damage was caused by contaminated water, like a sewage backup.
- You have a strong suspicion there’s a lot of hidden mold behind your walls.
Certified specialists have the proper training, containment gear, and air scrubbers to safely handle active mold growth.
You call a junk removal service like Fulton Junk Removal after the remediation work is done. Our team comes in to handle the responsible disposal of all the contained debris. For large-scale projects at offices, warehouses, or apartment complexes, we make the final cleanup seamless. We haul away the double-bagged drywall and any other renovation waste, giving you a clean slate.
After you’ve successfully removed mold from your drywall, it's smart to learn how to avoid mold in your home to prevent it from coming back. If you have questions about handling large volumes of debris or want to schedule a pickup, just get in touch through our Fulton Junk Removal contact page.